From South London to Summer in a Bowl
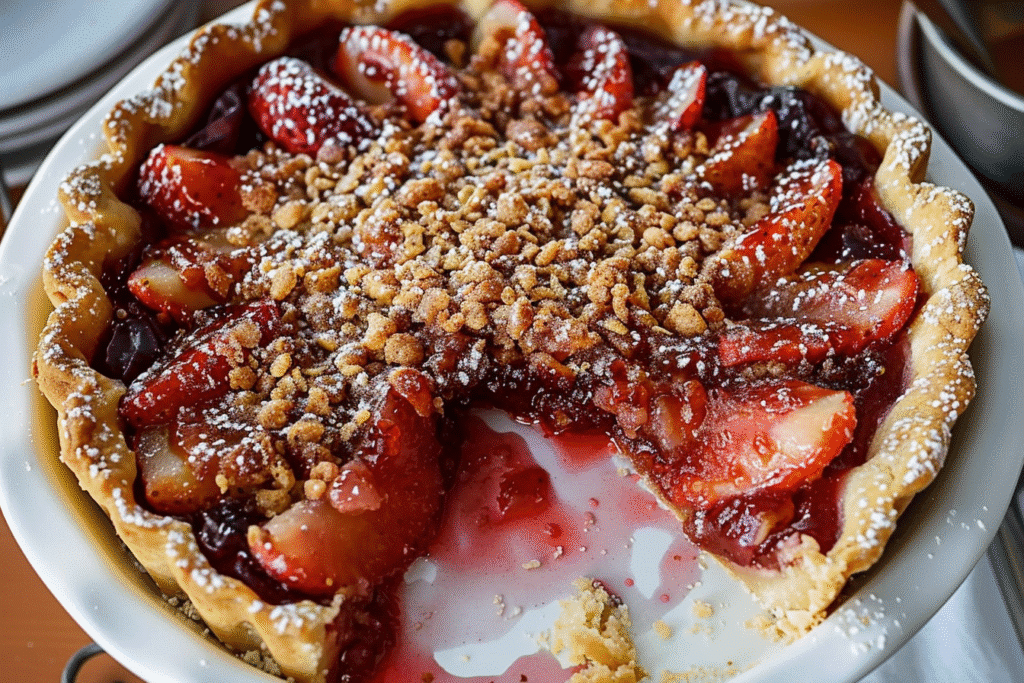
This Gluten Free Strawberry Crisp holds a little piece of my heart. Back when I was still scribbling recipes in my secondhand notebook in South London, strawberry season was always a highlight. I’d spot the punnets at the market, bright red and juicy, and immediately think of a warm Gluten Free Strawberry Crisp topped with something creamy. The recipe has evolved since those days—I’ve swapped in gluten free flour and oats, learned a few tricks with cornstarch, and picked up the American love for baking a Gluten Free Strawberry Crisp in a cast iron skillet—but that same nostalgic joy is still baked in every bite.
Now based in the U.S., strawberries still call me to the kitchen. And this Gluten Free Strawberry Crisp? It’s become one of those never-fails, whether for backyard cookouts, weeknight dinners, or just a craving for something warm and sweet. It’s quick, simple, and naturally gluten-free, with a buttery oat streusel topping that turns golden and crisp while the berries bubble underneath. Every bite brings together my past and present, and I think you’ll taste that mix of memories, too.
If you’ve enjoyed gluten-free comfort bakes like my blueberry scones or biscuit recipe, you’ll love this Gluten Free Strawberry Crisp. It’s casual and rustic, yet entirely special—exactly what home baking should be.
The Allure of Strawberry Crisp, Made Gluten-Free
There’s something so right about a dessert that doesn’t ask much of you. No rolling pins. No chilling. No fancy ingredients. Just fresh strawberries, a splash of lemon, and a simple crisp topping made from pantry basics. That’s the magic of this dish.
And the best part? It’s completely gluten free, but you’d never know. Using a trusted flour blend and certified gluten free oats, this strawberry crisp bakes into something rich and nostalgic, without the gluten. It’s a friendly recipe for beginners and seasoned bakers alike—no complicated steps or specialty tools required.
Whether you’re gluten-free by need or choice, or simply looking to try a lighter, fruit-forward bake, this easy gluten free strawberry crisp brings comfort and celebration together in one dish. For an even more satisfying dessert spread, pair it with gluten-free mains like my ramen noodle bowls or pita breads.
Print
Easy Gluten Free Strawberry Crisp – A Comforting Summer Classic with a Crisp Twist
- Total Time: 39 minutes
- Yield: 12 muffins 1x
- Diet: Gluten Free
Description
Moist gluten free strawberry cheesecake muffins filled with vanilla cream cheese and topped with streusel. Perfect for breakfast or dessert.
Ingredients
1 cup full-fat cream cheese
1/4 cup granulated sugar
1/2 tsp vanilla extract
2 cups fresh strawberries, chopped
3/4 cup caster sugar
Zest of 1 lemon
1/2 stick unsalted butter, melted
2 tbsp sunflower oil
1/3 cup plain yogurt
2 eggs
2 cups gluten free flour blend
1/4 cup almond flour
1 1/4 tsp baking powder
1/2 tsp baking soda
1/2 tsp xanthan gum
1/4 tsp salt
Streusel:
3/4 cup gluten free flour
1/4 cup brown sugar
3 tbsp cold unsalted butter
Instructions
1. Preheat oven to 375ºF and line muffin tin with paper liners.
2. Mix streusel ingredients and rub butter into dry mix. Set aside.
3. In a bowl, beat cream cheese, sugar, and vanilla for the filling. Set aside in a piping bag.
4. In another bowl, rub lemon zest into sugar. Add melted butter, oil, yogurt, eggs, and vanilla; mix well.
5. In a large bowl, whisk flour blend, almond flour, baking powder, baking soda, xanthan gum, and salt.
6. Toss chopped strawberries in dry mix to coat.
7. Add wet ingredients to dry and gently fold until combined.
8. Spoon batter into muffin cups, filling 3/4 full.
9. Insert piping tip into each and pipe in cheesecake filling, ending with a dollop on top.
10. Add halved strawberry and streusel to each muffin.
11. Bake for 20–24 minutes until golden and a toothpick comes out clean.
12. Cool in pan for 10 minutes, then transfer to a wire rack to cool completely.
Notes
Always use room temperature cream cheese to prevent lumps.
Store muffins in the fridge for up to 4 days or freeze without toppings for up to 2 months.
Allow chilled muffins to sit at room temp for 10 minutes before serving.
- Prep Time: 15 minutes
- Cook Time: 24 minutes
- Category: Breakfast, Dessert
- Method: Baking
- Cuisine: American
Nutrition
- Serving Size: 1 muffin
- Calories: 220
- Sugar: 14g
- Sodium: 120mg
- Fat: 10g
- Saturated Fat: 5g
- Unsaturated Fat: 4g
- Trans Fat: 0g
- Carbohydrates: 28g
- Fiber: 2g
- Protein: 4g
- Cholesterol: 35mg
Keywords: Gluten Free Strawberry Cheesecake Muffins
Part 2: Building the Best Gluten-Free Crisp
Choosing the Right Strawberries and Sweeteners
The base of any great Gluten Free Strawberry Crisp is, of course, the fruit. For the best results, use strawberries that are firm, fragrant, and sweet—but not too soft. Fresh berries are ideal for this Gluten Free Strawberry Crisp recipe, as they hold their texture during baking. While frozen strawberries are convenient, they release too much moisture and can lead to a soggy filling rather than the thick, jammy layer that makes this Gluten Free Strawberry Crisp so satisfying.
If your strawberries are large, quarter them. Smaller berries can simply be halved. Keeping the pieces a bit chunky helps them retain their shape and gives the finished Gluten Free Strawberry Crisp a more rustic, homemade feel. You want soft, syrupy fruit—not mush.
When it comes to sweetening the filling, less is more. Strawberries are naturally sweet, especially during peak season. One or two tablespoons of sugar are usually enough. Since the crisp topping already adds sweetness, keeping the filling lightly sweet ensures your Gluten Free Strawberry Crisp strikes the right balance—juicy, not overly sugary.
To thicken the filling, cornstarch is your go-to. Just a tablespoon or two stirred in before baking will turn the strawberry juices into a glossy, rich layer that clings beautifully to every bite. It’s the secret to a Gluten Free Strawberry Crisp that slices cleanly and scoops beautifully.
Need a fruity, easy breakfast idea to match this? You’ll also enjoy our gluten-free crepes—perfect for wrapping fresh berries and cream, just like the filling of your favorite Gluten Free Strawberry Crisp.
Crafting the Oat Streusel Topping Just Right
The topping is where the crisp earns its name—and its glory. For this easy gluten free strawberry crisp, we’re making a classic oat streusel that’s buttery, golden, and just the right amount of crunchy. You’ll only need a few ingredients: gluten-free flour blend, brown sugar, rolled oats, salt, and cold butter.
Cold butter is key. Unlike melted butter, which can turn sandy or greasy, cold cubed butter rubbed into the dry mix creates small crumbles that bake into crisp, golden nuggets. Use your fingers or a pastry cutter to break the butter into the flour mixture until it resembles coarse crumbs. Then stir in the oats and press the mixture gently with your hands to form clumps.
This method gives you that beloved contrast: slightly crisp bites with a tender, melt-in-your-mouth crumble. The oats bring texture and help differentiate a “crisp” from a “crumble” (which typically skips oats entirely). If oats aren’t your thing or you need to skip them due to sensitivity, you can absolutely substitute a nut-based crumble topping—like the almond version I use in my rhubarb cakes.
For a savory twist to balance your sweet cravings, check out our gluten-free bagel bites pizza—perfect for snacking before dessert.
Part 3: Gluten-Free Baking Know-How for Perfect Texture

Binding, Thickening, and Baking – The Science Bit
Let’s get practical. A crisp might look rustic and simple, but a few small technical tips will ensure your easy gluten free strawberry crisp comes out flawless every time.
First, let’s talk about thickening the filling. Cornstarch is your best friend here. Unlike flour or arrowroot, cornstarch has a neutral flavor and thickens fruit juices to that glossy, spoonable consistency without becoming cloudy. You only need 2 to 3 tablespoons to handle a pound or two of juicy strawberries. Mix it in just before baking to keep the berries from releasing too much liquid too early.
Next, it’s all about oven timing and temperature. Set your oven to 350°F (180°C) and bake your crisp in the center rack for 45 to 50 minutes. Don’t be tempted to pull it out too soon. The magic happens when the strawberry filling is bubbling—not just around the edges, but throughout the center. That bubbling means the cornstarch has activated and thickened everything properly.
If you want to be extra sure, grab a thermometer and check the center of the pan. The filling should hit about 195°F (90°C) before you take it out. This ensures that it’s thick, not watery, once cooled.
Finally, let it cool a little. A hot crisp straight from the oven can seem runny. Give it 20 to 30 minutes to settle and set before scooping. You’ll get that perfect balance of gooey fruit and crisp topping every time.
For more weekday comfort recipes that lean gluten-free without feeling restrictive, try our cottage cheese bagels—soft inside, toasty outside, and packed with protein.
Oat-Free Options and Allergy-Friendly Swaps
Not everyone can handle oats, even certified gluten-free ones. Whether you have celiac disease or a personal sensitivity, don’t worry—this easy gluten free strawberry crisp is super flexible.
To make an oat-free topping, you can simply sub in more flour or use almond flour for a rich, nutty twist. A blend of almond flour, gluten-free flour, and brown sugar creates a lovely tender crumble. If you need it to be nut-free as well, try using a mix of sunflower seed flour or finely ground coconut flakes.
Also, don’t forget about xanthan gum. Some gluten-free flour blends already include it, but if yours doesn’t, add 1/4 teaspoon to help bind the topping together. Without gluten’s natural elasticity, that little bit of xanthan gum gives the topping structure and helps prevent it from crumbling too far apart.
Want to pair this sweet finish with something light and savory? Explore our gluten-free dairy-free recipe collection—they’re ideal for building a meal around a crisp without overloading your table.
Part 4: Serving, Storing, and Flavor Boosts
How to Serve This Crisp Warm, Cold, or Reheated

One of the best things about this easy gluten free strawberry crisp is its flexibility. It’s just as good warm from the oven as it is cold from the fridge. Right after baking, let it cool slightly so the juices can thicken into that luscious syrupy layer. Spoon it warm into bowls with a scoop of vanilla ice cream or a swirl of whipped cream—it’s summer comfort at its best.
Planning to serve it later? Let it cool completely, then store it covered in the fridge for up to 3 days. You can reheat individual servings in the microwave for 30 seconds, or place the whole dish back in the oven at 325°F for 10–15 minutes until warmed through.
What’s special about this crisp is that the streusel topping holds its crunch, even after chilling. That means leftovers don’t feel like a second-rate option—they’re just as crave-worthy the next day. I’ve even eaten it cold straight from the dish (don’t judge—it was glorious).
And if you love the combo of crispy tops and jammy middles, definitely check out my vegan gluten-free donuts—their texture is just as playful and satisfying.
Make It Your Own – Flavor Twists, Additions, and Ideas
This recipe is a winner as-is, but it’s also endlessly customizable. Want to add more fruit? Try mixing in sliced apples or rhubarb for a tangy twist. A handful of raspberries or blueberries adds gorgeous color and depth. Just remember to keep the total fruit amount around 6 to 7 cups for even baking.
Spices can also elevate the flavor. Cinnamon, cardamom, or even a touch of ground ginger pairs beautifully with strawberries. For extra brightness, use lemon zest in the filling. And if you’re feeling indulgent, drizzle some honey or maple syrup over the crisp just before serving.
The topping is flexible, too. Swap brown sugar for coconut sugar, or throw in chopped nuts like pecans or almonds for crunch. If you’re serving a crowd, bake your crisp in individual ramekins for cute single portions that make dessert feel extra special.
If you’re looking to build an entire gluten-free dessert board, add a tray of wonton gluten-free wrappers filled with fruit preserves or cream cheese—they bake quickly and look beautiful beside your crisp.
FAQs
Can you make crumble with strawberries?
Absolutely. Strawberries are a great base for crumbles or crisps. The difference is that crumbles typically skip oats in the topping, using just flour, sugar, and butter for a more cake-like texture.
Are apples and strawberries gluten-free?
Yes, both apples and strawberries are naturally gluten-free. Just make sure any added ingredients, like thickeners or toppings, are certified gluten-free.
Can you use frozen strawberries in a crisp?
You can, but it’s not ideal. Frozen strawberries release more water during baking, which can lead to a soggy texture. If using frozen, add extra cornstarch and expect a softer filling.
Conclusion
This easy gluten free strawberry crisp is more than just a dessert—it’s a warm bowl of memory, comfort, and sunshine. Whether you’re gluten-free by necessity or simply craving a light, rustic sweet treat, this crisp delivers all the satisfaction without the stress. It’s quick to prepare, endlessly flexible, and guaranteed to make your kitchen smell like a summer holiday.
I’ve made this dish in tiny flats and family kitchens, for casual dinners and celebratory potlucks. Every time, it’s met with smiles and seconds. That’s the power of simple ingredients done right. So next time you spot fresh strawberries at the market, grab a basket and treat yourself to this delicious moment.
And if you’re already dreaming of your next bake, take a peek at our gluten-free chicken dishes or browse the vegan gluten-free section—because good food should always feel this easy and joyful.
If you loved this Gluten Free Strawberry Crisp and you’re always on the lookout for more cozy, no-fuss gluten-free recipes, come hang out with me where I share even more seasonal favorites and kitchen stories.
You’ll find fresh updates, behind-the-scenes cooking, and real-time kitchen chats over on Facebook. It’s a great space to connect, ask questions, and swap ideas with fellow home cooks.
Prefer to scroll, save, and plan your next bake visually? Head to my Pinterest page—it’s full of gluten-free desserts, comforting classics, and beautifully simple dishes I know you’ll want to try.
Follow along and keep the inspiration flowing straight from my kitchen to yours.

